Writing a program directly in x86 machine code
If you ever programmed in your life you probably heard somebody saying computers only understand 0s and 1s. Or maybe you met somebody more technical that said the compiler takes your code and generate machine code.
Both statements are true. However, have you thought on how this works in reality? Well, I did and if you did too, this post is for you!
In this post I am going to show you how a simple code turns into machine code. We are going to start with a very simple “Hello World” written in a low-level language called Assembly.
The language name is Assembly not Assembler as many tutorials say. Assembler is the “compiler” that assembles the low-level code into machine/binary code.
Pre-requisites
My environment for this tutorial is Windows 11 with a couple of tools that I’ll list next. So, if you plan to follow this tutorial, you must have the following:
- DOSBox: in a nutshell DOSBox is an emulator for the old DOS.
- nasm (DOS version): this is The Netwide Assembler and, yes, your are right, this is the assembler we are going to use.
- Python: we are going to use the Python interpreter version > 3.10.
- HxD: This and hexadecimal editor that will be using to visualize the binary code. It is optional, if you don’t want to download it, just check the screenshot.
I’ll next explain why we need all these different tools.
The Plan
We are going to start with an Assembly code to generate a binary so we can execute it in DOSBox. Then we will use what we learned to write our own executable in binary! To make this tutorial as simple as possible we will use Python to write the binary file for us, but we will manually (or copying-pasting) the machine code. That said, we will do the following:
- Write the Hello World in Assembly language.
- The assembler will generate a
.COMfile.
- The assembler will generate a
- Analyze the assembled file in HxD (the hexadecimal editor).
- HxD allows us to inspect the binary code assembled. You can use other hexadecimal editor.
- Next we are going to write a Python code that will use hexadecimal code to generate a new (binary) file.
You don’t need to do this in an isolated environment, like a virtual machine, because we won’t do anything dangerous. And don’t worry too much, I’ll explain just enough so you can understand what is going on here.
The Hello World in Assembly
If you never heard about Assembly language you can check the Wikipedia for por details. For now, understand that assembly is a low-level language, that means you need to be specific on what you want to do. Forget about those sweet data structures you use in Python, Java or C#. All of those are high-level languages. The high part is about the level of abstraction, that means you do more writing less code.
With Assembly things are different. It is the lowest human-readable level language you can code, lower than Assembly only the binary code. That said, assembly has many flavors and that is because you write the code for that process platform. For example, Assembly for x86 is different from x64 which is different from ARM32 and ARM64. Portability is another sweet feature we take for granted when we code in with a high-level language.
We are going to use Assembly to generate a .COM file, yes, that old DOS-era file format. The reason for that is that a COM file has no header that a ELF or EXE (PE) file has. A COM file is flat binary which, for us, means that it is easier to understand.
Let’s dive into the Assembly code. Our code will do two things only:
- Print a hello world message.
- Exit the execution.
The explanation in in the comments. By the way, a comment in the Assembly we are going to use starts with ;. So, first create an empty text file, call it hello.asm, and type (or copy and paste) the following code.
; COM format doesn't have relocation support,
; so you must to tell the assembler to load it in a specific
; memory location, the offset 0100h
org 100h

; this is the binary file section where the data is stored
; our 'data' is just the 'hello world' string
section .data
    hello db 'Hello, World!$', 0

; besides the name (text), this is the section where the actual code is
section .text
    ; print the message to the screen
    ; before 'printing' we must to set the parameters first

    ; MOV 9 to the register AH. This means "print string" function
    mov ah, 9
    ; Load the offset address of 'hello world' into register DX
    mov dx, hello

    ; Call the DOS interrupt 21h to execute the function
    int 21h

    ; Exit the program
    ; same thing, move the parameters then execute

    ; AH=4Ch means "exit" function
    mov ah, 4Ch
    ; Set AL to 0 (return code)
    xor al, al

    ; Call the DOS interrupt 21h to exit the program
    int 21h
Note that, in flat binaries, sections are ignored by the loader and exist only to help the assembler organize code.
All the mov about aim to set the “parameters” that are going to be used when the interrupt (int) is called. Take for example the last call to int 21h, According to Ralf Brown’s DOS interrupt list one must to set in the register ah the function we want to execute when the interrupt is called. Since we want the exit function, we pass (move) 4Ch to the register ah. Next, we need to set the return value of the exit function, we want it to be 0 (xor al,al executes the xor operation on the al register, resulting in 0) which means that our software finished the execution and exited gracefully.
Now this is the time to compile the code and generate our COM file. Remember that the nasm version we downloaded is the DOS version, so it won’t run on Windows 10-11. To properly run it you must to open DOSBox ond go to the folder where the code and nasm is. Make sure you have the same files as me as shown in the screenshot below

Next, we are going to compile (assemble) the code we created. Type:
nasm -f bin hello.asm -o hello.com
What the command above does is first invoke nasm by specifiying the output format -f which is flat binary (bin), followed by the input file hello.asm and the output -o file hello.com. When you type dir again you’ll be able to see the COM file generated. For now your directory should be similar to the image below:

Now it is the time… run it by typing hello.com. You should see the Hello World message:

Analyzing the Binary File
Next, let’s analyze the the hello.com file in HxD. You can you the hexadecimal editor of your choice. No matter which editor you use, the content must be similar with that is shown in the following image:
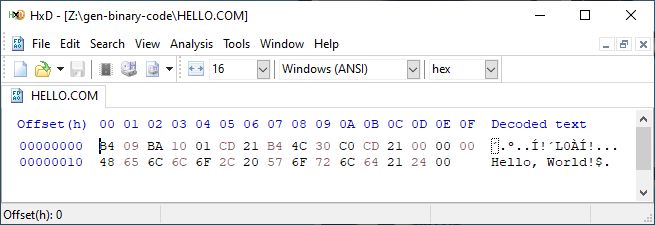
Besides some extra information, the actually content of the COM file is shown into those three lines starting with B4 09 ..., 48 65 ..., and, 65 6C .... In other words, this is the machine code in hexadecimal!
It is worth to note that hexademical is just another way to represent the binary code, the 0s and 1s that the processor will see.
Let’s start our analysis with the first two bytes, B4 09:
-
B4: this line basically says move imm8 into something. In Assembly, the machine codeB4corresponds tomov something, imm81. On x86B4is part of a special family of opcodes:B0–B7 -> MOV r8, imm8: 8bit registersB8–BF -> MOV r16, imm16: 16bit registers
So, for the x86 architecture specification says:
B0 -> mov al, imm8B1 -> mov cl, imm8B2 -> mov dl, imm8B3 -> mov bl, imm8B4 -> mov ah, imm8<— this is what we have
That said, the
B4will move the data (imm8) into the registerah. The data specification comes from the next byte, -
09: this is a 8bit value. No novelty here.
Based on this initial analysis, you’ll see that the instruction represented by B4 09 is exactly the instruction we have in your Assembly code shown previously!
The next byte, BA , is quite interesting. It is also a MOV but for a a 16bit register:
BA = 1011 1010
     ^^^^  ^^^
     |     |
     |     +- 010 = DX
     |
     +------- 1011 = MOV r16, imm16
Since we are trying to move something of 16bit, we must to analyze the next two bytes, not only one. The next two bytes are 10 01. Remember that x86 is little-endian, meaning least significant byte first. Thus, 10 01 -> 0110h and therefore, BA 10 01 resolves to mov dx, 0110h.
In a COM file, the segment pointers (CS, DS, ES and SS) point to the same segment and all the program is loaded at the offset 0100h (recall the first line, org 100h, of our Assembly code). That means that DOS expects the string address in DS:DX. In a .COM program, DOS initializes DS to the same segment as the code, so setting DX alone is sufficient.
Because a .COM program is loaded at offset 0100h, a label assembled as 0110h corresponds to file offset 10h. Subtracting the load base (0110h − 0100h) shows that the string starts 16 bytes into the file, which matches the data visible at offset 10h in HxD.
A string in a COM file must be terminated with the $ symbol, so the last byte shown in HxD shows the number 24. Checking a hex to char table you’ll see that 24 corresponds to the character $.
The analysis we did previously is enough to you decode all the machine code into the opcode. This can be your homework ;)
Writing our own binary code
Now that we have identified what each byte of our COM file means, we can do the reverse: write in hexadecimal file and later execute it!
For didactic purposes we started with the Assembly code to get the machine code. However, someone could just say Forget assemblers and compilers, I want write my software in machine code!. As we saw before, to achieve this, one must to know what is the machine code corresponding to each opcode! “Just like that!”. Since it is doable, so let’s do that.
Let’s assume that we know the exact “machine code -> opcode” we need to build our “Hello World”. One has two options: use a software that can generate binary from the hexadecimal, or; write I script to do this for us. We are going to stick with the later.
To write our binary code and generate the new executable (COM) with it we are going to use a Python script. I know Python is overkill, but purpose here is just to demonstrate how it can be done rather the optimize each step. So, Python is me easiest language to use for this. The following code does what we need:
# first we define our machine code sequence
machine_code = (
    b"\xB4\x09"          # mov ah, 9
    b"\xBA\x10\x01"      # mov dx, [message offset]
    b"\xCD\x21"          # int 21h
    b"\xB4\x4C"          # mov ah, 4Ch
    b"\x30\xC0"          # xor al, al
    b"\xCD\x21"          # int 21h
    b"\x00\x00\x00"      # padding, aligning the message bytes
    # Message with DOS string terminator ($)
    b"\x48\x65\x6C\x6C\x6F\x2C\x20\x57\x6F\x72\x6C\x64\x21\x24\x00"
)

fn = "hello-manual.com"

# now we write that sequence of bytes into a binary file: "wb"
with open(fn, "wb") as f:
    f.write(machine_code)

print(f"DOS .com file '{fn}' created successfully.")
Now try to run your new executable in DOSBox and you did previously. You’ll see the exact same message! Congratulations you wrote your first software in machine code. From now on, when somebory says that “a software is just a bunch of bytes” you’ll actually know what that means!
Wrapping up
In this tutorial you learned how to actually write a software in binary! To make that happen we downsized things a little bit to make it doable. We decide to have our software, a Hello World, to be a flat binary, thus we decided for a COM file. We could do that in a high-level language like C or any other, but we wanted to avoid any garbage inserted by the compiler, so we went with Assembly. After assemble our code we analyzed the executable to make sense of all the bytes shown in HxD. Next, we did the oposit: write our own binary code into a COM file, for this we used a Python script.
I really hope you enjoyed this walk through.